Users
Use this function to create new users in the application.
| Role Access permissions must be set before adding a user. |
In the main window, click Admin > Users > Users. The Access Management window displays.
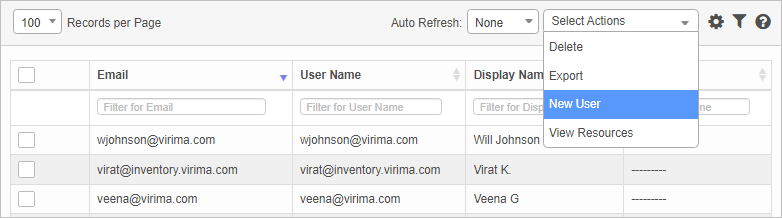
The Access Management window displays
![]()
| 1. | From the Select Actions drop-down list, choose New User. |
| 2. | To complete the fields, refer to the table below. |
| 3. | When all selections/entries are made, click Add. |
New User Details Fields
| Field | Description | ||
|---|---|---|---|
| User's email address. | |||
| Username | Username for logging into the system. | ||
|
Is VIP |
Identifies a user for whom their tickets are given a 1-Priority, by default.
|
||
|
Is Active |
When selected, the user is active in the application and can perform the assigned activities.
|
||
|
Enable MFA |
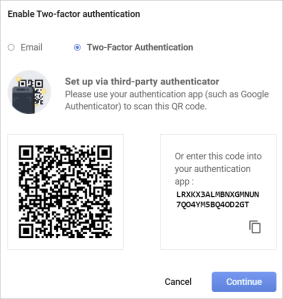
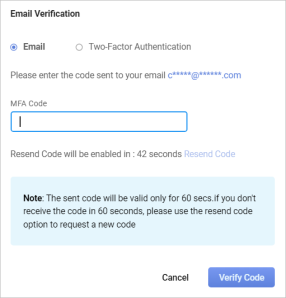
When enabled, upon trying to log in, the user receives an email verification screen and can select to use either Email or Two-Factor Authentication.
If Email is selected, an MFA code is sent and that code must be entered. If the code is not received, click Resend Code.
Two-Factor Authentication If Two-Factor Authentication is selected, follow the instructions in this dialog box and do one of the following: If the QR code is scanned, click Continue, check the Google Authenticator app, enter the token, and click Verify Token.
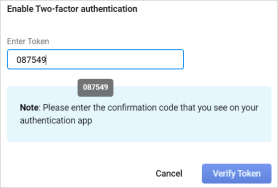
Enter the code shown into the Google Authenticator app.
To disable the verification process, click Reset MFA. |
||
|
Authentications |
Check based on the organization authentication process. Choices are LDAP, AD, SAML, and Normal. |
||
|
Password |
The password associated with the username. The password must be validated by entering it a second time in the Re-Enter Password field. To display the password, click Show Password checkbox or click the Show icon. |
||
|
User Information Fields |
Specifies the information to display within the application. |
||
| Location |
Specifies the location of the user. Click Add and, in the Location dialog box, search for and select the applicable location. If a location is not shown, it has not been set up in the application. |
||
|
Assigns a role(s) to the user that allows the user to perform assigned responsibilities.
|
|||
|
Associates the user with a department.
|
|||
|
Associates the user with a group.
|
|||
|
Report To |
Specifies to whom the user reports.
|
||
|
Assigns a designation to the user.
|
|||
|
Profile Picture |
Displays a profile picture for the user. Click Upload. In the Attach File dialog box, Browse to the location of the photo, select the photo, then click OK. |
||
|
Landing Page |
Specifies the page that displays to the user on first accessing the application. |
||
|
Language |
Specifies the users language. |
Use this function to import new users by uploading a file.
| 1. | From the Select Actions drop-down list, choose Import New User(s). The Attach Data Files dialog box displays. |
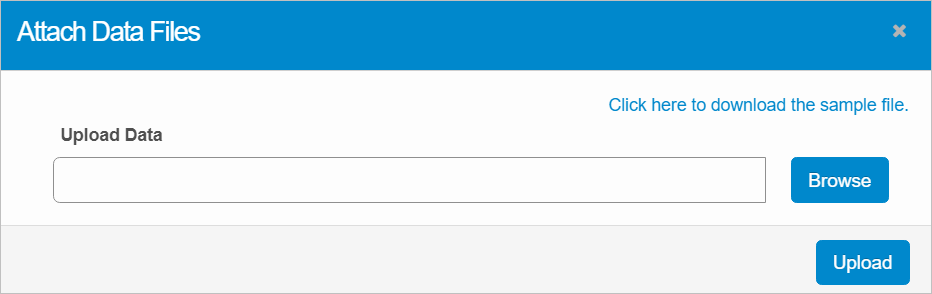
| 2. | Browse to the location of the file to import. |
| 3. | Click Upload. |
Use this function edit multiple users at the same time.
| 1. | In the list, highlight each user record to edit. |
| 2. | From the Select Actions drop-down list, choose Bulk Edit. |
| 3. | In the Confirmation message window, click Yes. |
| 4. | Refer to the information under "New Users" for information on the available fields and options. |
| 5. | When all selections/entries are made, click Update. The details for all the select users is updated. |
Use this function to enable multi-factor authentication for one or more users.
| 1. | In the list, highlight each user for which MFA should be enabled. If not selection is made, MFA will be enabled for all users. |
| 2. | Click Enable MFA. |
| To reset MFA, open the user's profile and click Reset MFA. |
Use this function to view details for a user, such as tasks performed, hours spent on the task, status of a task (such as Active, Started, and Not Started), and dates on which tasks occurred.
| 1. | In the main window, click Admin > Users > Users. The Access Management window displays. |
| 2. | From the Select Actions drop-down list, choose View Resources. A new window opens and provides the relevant details. |
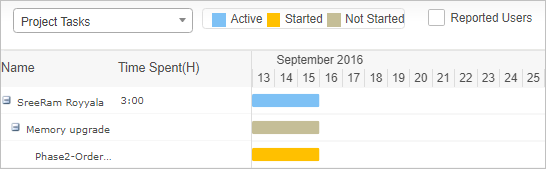
| 3. | To toggle between Projects and Miscellaneous Tasks, use the drop-down list. |
| 4. | To view users who have reported, click Reported Users. |
| 5. | To close the window, click the X in the right upper corner of the window. |
| Not all functions include an option to edit record line items shown in the main window. |
| 1. | Navigate to the window containing the record to edit. |
| 2. | Click the line containing the record. The applicable window or dialog box displays. |
| 3. | Make the necessary modifications. |
| 4. | Click Save or Add, as applicable. |
When editing an existing item, other options may be available, such as adding Tasks, Comments, and Attachments and viewing History.
| The options change based upon the function; therefore, not every option may be shown. |
In this window, you can also:
| Deleting is a permanent action and cannot be undone. Deleting may affect other functionality and information in the application such as data in configured reports, fields in windows, selectable options, etc. Therefore, be sure to understand the potential effects before making a deletion. |
| 1. | Click the line that contains the item to delete. |
| 2. | From the Select Actions drop-down list, choose Delete. If a confirmation message is displayed, take the appropriate action (for example, click OK or Continue). |
Other Functions and Page Elements